通常来说,你会通过 props 将信息从父组件传递到子组件。但是,如果你必须通过许多中间组件向下传递 props,或是在你应用中的许多组件需要相同的信息,传递 props 会变的十分冗长和不便。Context 允许父组件向其下层无论多深的任何组件提供信息,而无需通过 props 显式传递。
你将会学习到
- 什么是 “prop 逐级透传”
- 如何使用 context 代替重复的参数传递
- Context 的常见用法
- Context 的常见替代方案
传递 props 带来的问题
传递 props 是将数据通过 UI 树显式传递到使用它的组件的好方法。
但是当你需要在组件树中深层传递参数以及需要在组件间复用相同的参数时,传递 props 就会变得很麻烦。最近的共同祖先组件可能离需要数据的组件很远,状态提升 到太高的层级会导致 “逐层传递 props” 的情况。
状态提升
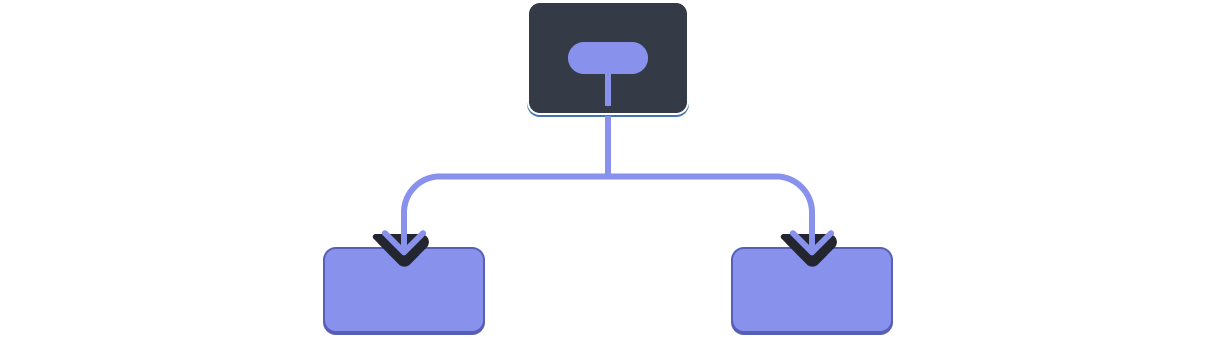
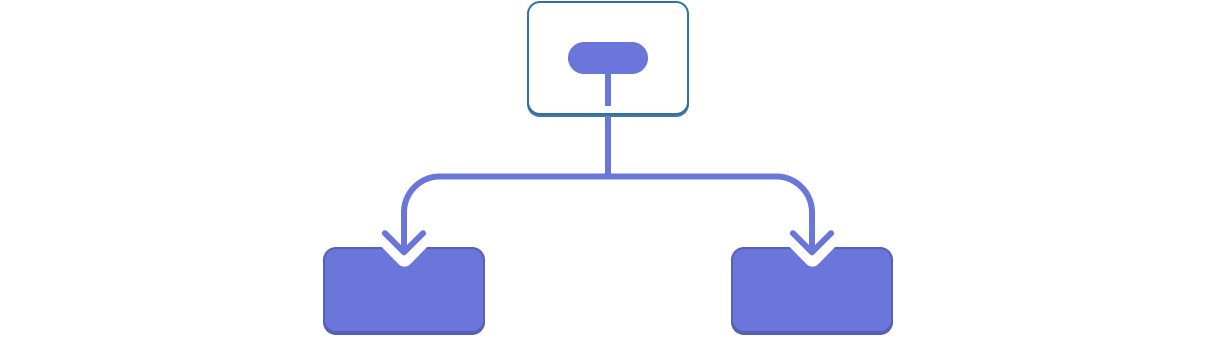
Prop 逐级透传

要是有一种方法可以在组件树中不需要 props 将数据“直达”到所需的组件中,那可就太好了。React 的 context 功能可以满足我们的这个心愿。
Context:传递 props 的另一种方法
Context 让父组件可以为它下面的整个组件树提供数据。Context 有很多种用途。这里就有一个示例。思考一下这个 Heading 组件接收一个 level 参数来决定它标题尺寸的场景:
import Heading from './Heading.js';
import Section from './Section.js';

export default function Page() {
  return (
    <Section>
      <Heading level={1}>主标题</Heading>
      <Heading level={2}>副标题</Heading>
      <Heading level={3}>子标题</Heading>
      <Heading level={4}>子子标题</Heading>
      <Heading level={5}>子子子标题</Heading>
      <Heading level={6}>子子子子标题</Heading>
    </Section>
  );
}
假设你想让相同 Section 中的多个 Heading 具有相同的尺寸:
import Heading from './Heading.js';
import Section from './Section.js';

export default function Page() {
  return (
    <Section>
      <Heading level={1}>主标题</Heading>
      <Section>
        <Heading level={2}>副标题</Heading>
        <Heading level={2}>副标题</Heading>
        <Heading level={2}>副标题</Heading>
        <Section>
          <Heading level={3}>子标题</Heading>
          <Heading level={3}>子标题</Heading>
          <Heading level={3}>子标题</Heading>
          <Section>
            <Heading level={4}>子子标题</Heading>
            <Heading level={4}>子子标题</Heading>
            <Heading level={4}>子子标题</Heading>
          </Section>
        </Section>
      </Section>
    </Section>
  );
}
目前,你将 level 参数分别传递给每个 <Heading>:
<Section>
  <Heading level={3}>关于</Heading>
  <Heading level={3}>照片</Heading>
  <Heading level={3}>视频</Heading>
</Section>
将 level 参数传递给 <Section> 组件而不是传给 <Heading> 组件看起来更好一些。这样的话你可以强制使同一个 section 中的所有标题都有相同的尺寸:
<Section level={3}>
  <Heading>关于</Heading>
  <Heading>照片</Heading>
  <Heading>视频</Heading>
</Section>
但是 <Heading> 组件是如何知道离它最近的 <Section> 的 level 的呢?这需要子组件可以通过某种方式“访问”到组件树中某处在其上层的数据。
你不能只通过 props 来实现它。这就是 context 大显身手的地方。你可以通过以下三个步骤来实现它:
- 创建 一个 context。(你可以将其命名为
LevelContext, 因为它表示的是标题级别。) - 在需要数据的组件内 使用 刚刚创建的 context。(
Heading将会使用LevelContext。) - 在指定数据的组件中 提供 这个 context。(
Section将会提供LevelContext。)
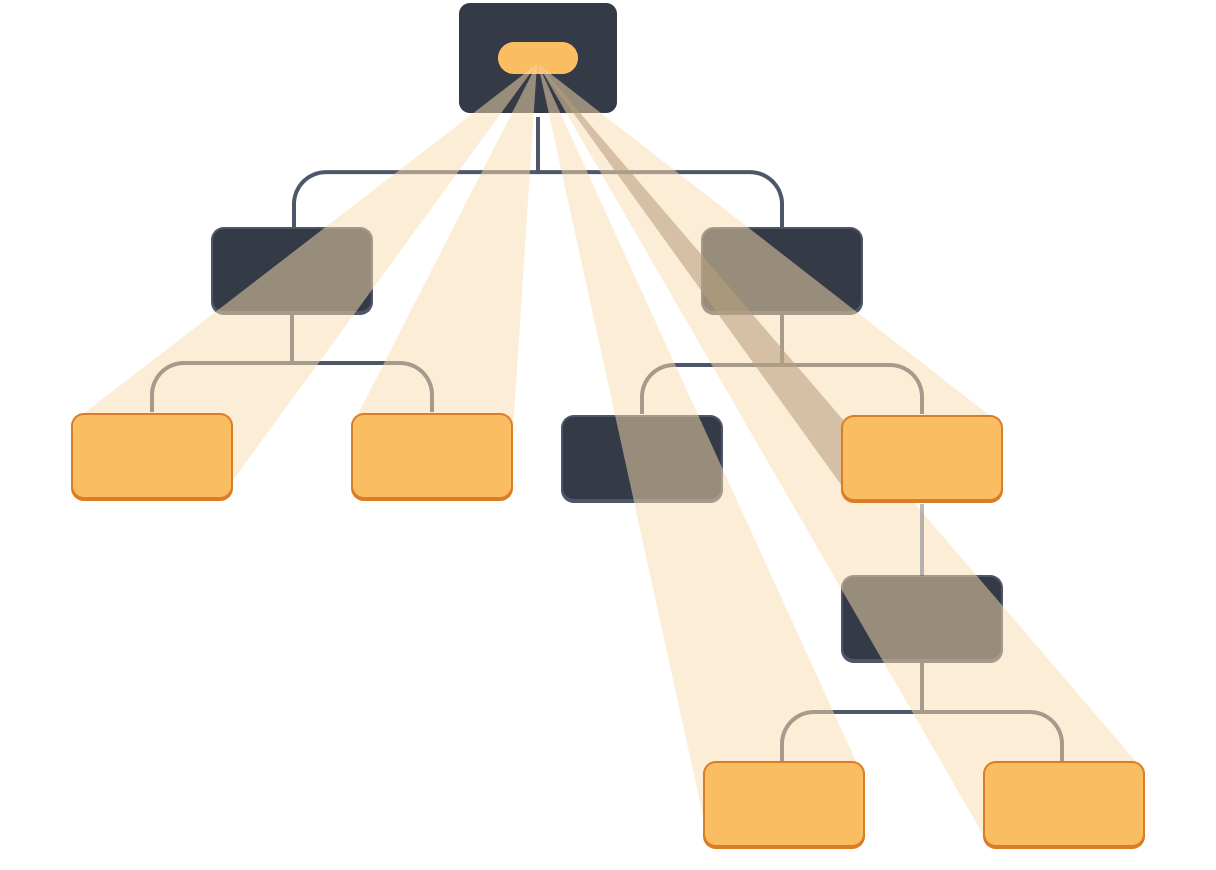
Context 可以让父节点,甚至是很远的父节点都可以为其内部的整个组件树提供数据。
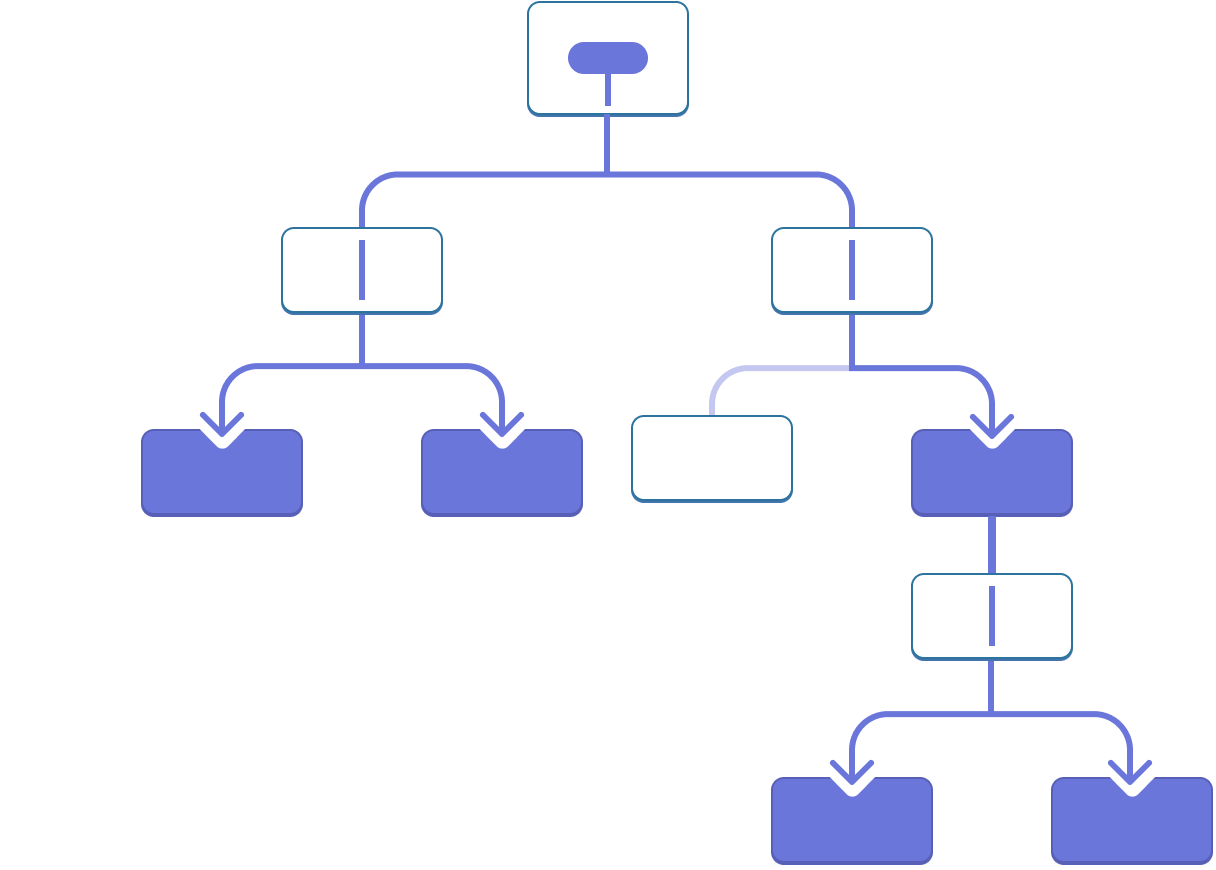
同级子组件使用 context


远亲组件使用 context
Step 1:创建 context
首先,你需要创建这个 context,并 将其从一个文件中导出,这样你的组件才可以使用它:
import { createContext } from 'react';

export const LevelContext = createContext(1);
createContext 只需默认值这么一个参数。在这里, 1 表示最大的标题级别,但是你可以传递任何类型的值(甚至可以传入一个对象)。你将在下一个步骤中见识到默认值的意义。
Step 2:使用 Context
从 React 中引入 useContext Hook 以及你刚刚创建的 context:
import { useContext } from 'react';
import { LevelContext } from './LevelContext.js';目前,Heading 组件从 props 中读取 level:
export default function Heading({ level, children }) {
  // ...
}
删掉 level 参数并从你刚刚引入的 LevelContext 中读取值:
export default function Heading({ children }) {
  const level = useContext(LevelContext);
  // ...
}
useContext 是一个 Hook。和 useState 以及 useReducer一样,你只能在 React 组件中(不是循环或者条件里)立即调用 Hook。useContext 告诉 React Heading 组件想要读取 LevelContext。
现在 Heading 组件没有 level 参数,你不需要再像这样在你的 JSX 中将 level 参数传递给 Heading:
<Section>
  <Heading level={4}>子子标题</Heading>
  <Heading level={4}>子子标题</Heading>
  <Heading level={4}>子子标题</Heading>
</Section>
修改一下 JSX,让 Section 组件代替 Heading 组件接收 level 参数:
<Section level={4}>
  <Heading>子子标题</Heading>
  <Heading>子子标题</Heading>
  <Heading>子子标题</Heading>
</Section>
你将修改下边的代码直到它正常运行:
import Heading from './Heading.js';
import Section from './Section.js';

export default function Page() {
  return (
    <Section level={1}>
      <Heading>主标题</Heading>
      <Section level={2}>
        <Heading>副标题</Heading>
        <Heading>副标题</Heading>
        <Heading>副标题</Heading>
        <Section level={3}>
          <Heading>子标题</Heading>
          <Heading>子标题</Heading>
          <Heading>子标题</Heading>
          <Section level={4}>
            <Heading>子子标题</Heading>
            <Heading>子子标题</Heading>
            <Heading>子子标题</Heading>
          </Section>
        </Section>
      </Section>
    </Section>
  );
}
注意!这个示例还不能运行。所有 headings 的尺寸都一样,因为 即使你正在使用 context,但是你还没有提供它。 React 不知道从哪里获取这个 context!
如果你不提供 context,React 会使用你在上一步指定的默认值。在这个例子中,你为 createContext 传入了 1 这个参数,所以 useContext(LevelContext) 会返回 1,把所有的标题都设置为<h1>。我们通过让每个 Section 提供它自己的 context 来修复这个问题。
Step 3:提供 context
Section 组件目前渲染传入它的子组件:
export default function Section({ children }) {
  return (
    <section className="section">
      {children}
    </section>
  );
}
把它们用 context provider 包裹起来 以提供 LevelContext 给它们:
import { LevelContext } from './LevelContext.js';

export default function Section({ level, children }) {
  return (
    <section className="section">
      <LevelContext value={level}>
        {children}
      </LevelContext>
    </section>
  );
}
这告诉 React:“如果在 <Section> 组件中的任何子组件请求 LevelContext,给他们这个 level。”组件会使用 UI 树中在它上层最近的那个 <LevelContext> 传递过来的值。
import Heading from './Heading.js';
import Section from './Section.js';

export default function Page() {
  return (
    <Section level={1}>
      <Heading>主标题</Heading>
      <Section level={2}>
        <Heading>副标题</Heading>
        <Heading>副标题</Heading>
        <Heading>副标题</Heading>
        <Section level={3}>
          <Heading>子标题</Heading>
          <Heading>子标题</Heading>
          <Heading>子标题</Heading>
          <Section level={4}>
            <Heading>子子标题</Heading>
            <Heading>子子标题</Heading>
            <Heading>子子标题</Heading>
          </Section>
        </Section>
      </Section>
    </Section>
  );
}
这与原始代码的运行结果相同,但是你不需要向每个 Heading 组件传递 level 参数了!取而代之的是,它通过访问上层最近的 Section 来“断定”它的标题级别:
- 你将一个
level参数传递给<Section>。 Section把它的子元素包在<LevelContext value={level}>里面。Heading使用useContext(LevelContext)访问上层最近的LevelContext提供的值。
在相同的组件中使用并提供 context
目前,你仍需要手动指定每个 section 的 level:
export default function Page() {
  return (
    <Section level={1}>
      ...
      <Section level={2}>
        ...
        <Section level={3}>
          ...
由于 context 让你可以从上层的组件读取信息,每个 Section 都会从上层的 Section 读取 level,并自动向下层传递 level + 1。
你可以像下面这样做:
import { useContext } from 'react';
import { LevelContext } from './LevelContext.js';

export default function Section({ children }) {
  const level = useContext(LevelContext);
  return (
    <section className="section">
      <LevelContext value={level + 1}>
        {children}
      </LevelContext>
    </section>
  );
}
这样修改之后,你不用将 level 参数传给 <Section> 或者是 <Heading> 了:
import Heading from './Heading.js';
import Section from './Section.js';

export default function Page() {
  return (
    <Section>
      <Heading>主标题</Heading>
      <Section>
        <Heading>副标题</Heading>
        <Heading>副标题</Heading>
        <Heading>副标题</Heading>
        <Section>
          <Heading>子标题</Heading>
          <Heading>子标题</Heading>
          <Heading>子标题</Heading>
          <Section>
            <Heading>子子标题</Heading>
            <Heading>子子标题</Heading>
            <Heading>子子标题</Heading>
          </Section>
        </Section>
      </Section>
    </Section>
  );
}
现在,Heading 和 Section 都通过读取 LevelContext 来判断它们的深度。而且 Section 把它的子组件都包在 LevelContext 中来指定其中的任何内容都处于一个“更深”的级别。
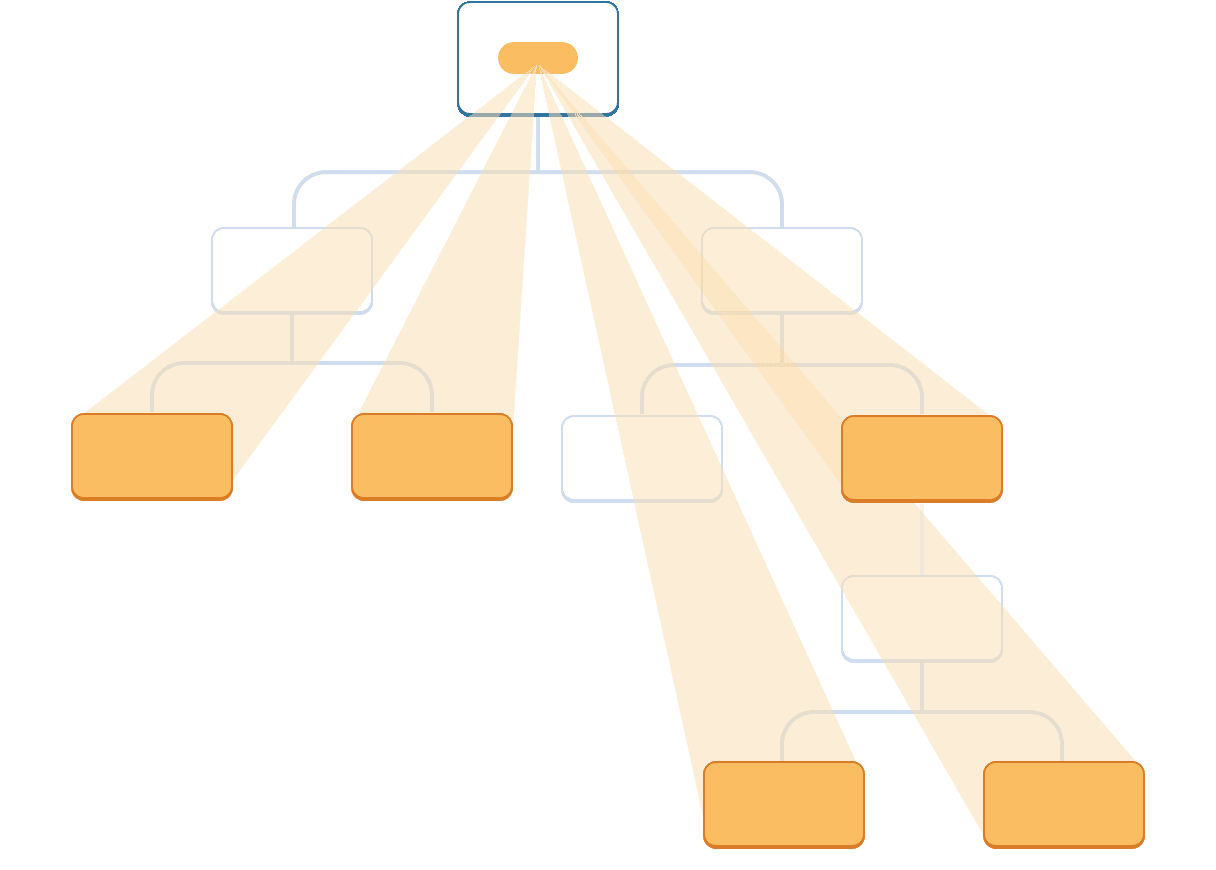
Context 会穿过中间层级的组件
你可以在提供 context 的组件和使用它的组件之间的层级插入任意数量的组件。这包括像 <div> 这样的内置组件和你自己创建的组件。
在这个示例中,相同的 Post 组件(带有虚线边框)在两个不同的嵌套层级上渲染。注意,它内部的 <Heading> 会自动从最近的 <Section> 获取它的级别:
import Heading from './Heading.js';
import Section from './Section.js';

export default function ProfilePage() {
  return (
    <Section>
      <Heading>My Profile</Heading>
      <Post
        title="旅行者,你好!"
        body="来看看我的冒险。"
      />
      <AllPosts />
    </Section>
  );
}

function AllPosts() {
  return (
    <Section>
      <Heading>帖子</Heading>
      <RecentPosts />
    </Section>
  );
}

function RecentPosts() {
  return (
    <Section>
      <Heading>最近的帖子</Heading>
      <Post
        title="里斯本的味道"
        body="...那些蛋挞!"
      />
      <Post
        title="探戈节奏中的布宜诺斯艾利斯"
        body="我爱它!"
      />
    </Section>
  );
}

function Post({ title, body }) {
  return (
    <Section isFancy={true}>
      <Heading>
        {title}
      </Heading>
      <p><i>{body}</i></p>
    </Section>
  );
}
你不需要做任何特殊的操作。Section 为它内部的树指定一个 context,所以你可以在任何地方插入一个 <Heading>,而且它会有正确的尺寸。在上边的沙箱中尝试一下!
Context 让你可以编写“适应周围环境”的组件,并且根据 在哪 (或者说 在哪个 context 中)来渲染它们不同的样子。
Context 的工作方式可能会让你想起 CSS 属性继承。在 CSS 中,你可以为一个 <div> 手动指定 color: blue,并且其中的任何 DOM 节点,无论多深,都会继承那个颜色,除非中间的其他 DOM 节点用 color: green 来覆盖它。类似地,在 React 中,覆盖来自上层的某些 context 的唯一方法是将子组件包裹到一个提供不同值的 context provider 中。
在 CSS 中,诸如 color 和 background-color 之类的不同属性不会覆盖彼此。你可以设置所有 <div> 的 color 为红色,而不会影响 background-color。类似地,不同的 React context 不会覆盖彼此。你通过 createContext() 创建的每个 context 都和其他 context 完全分离,只有使用和提供 那个特定的 context 的组件才会联系在一起。一个组件可以轻松地使用或者提供许多不同的 context。
写在你使用 context 之前
使用 Context 看起来非常诱人!然而,这也意味着它也太容易被过度使用了。如果你只想把一些 props 传递到多个层级中,这并不意味着你需要把这些信息放到 context 里。
在使用 context 之前,你可以考虑以下几种替代方案:
- 从 传递 props 开始。 如果你的组件看起来不起眼,那么通过十几个组件向下传递一堆 props 并不罕见。这有点像是在埋头苦干,但是这样做可以让哪些组件用了哪些数据变得十分清晰!维护你代码的人会很高兴你用 props 让数据流变得更加清晰。
- 抽象组件并 将 JSX 作为
children传递 给它们。 如果你通过很多层不使用该数据的中间组件(并且只会向下传递)来传递数据,这通常意味着你在此过程中忘记了抽象组件。举个例子,你可能想传递一些像posts的数据 props 到不会直接使用这个参数的组件,类似<Layout posts={posts} />。取而代之的是,让Layout把children当做一个参数,然后渲染<Layout><Posts posts={posts} /></Layout>。这样就减少了定义数据的组件和使用数据的组件之间的层级。
如果这两种方法都不适合你,再考虑使用 context。
Context 的使用场景
- 主题: 如果你的应用允许用户更改其外观(例如暗夜模式),你可以在应用顶层放一个 context provider,并在需要调整其外观的组件中使用该 context。
- 当前账户: 许多组件可能需要知道当前登录的用户信息。将它放到 context 中可以方便地在树中的任何位置读取它。某些应用还允许你同时操作多个账户(例如,以不同用户的身份发表评论)。在这些情况下,将 UI 的一部分包裹到具有不同账户数据的 provider 中会很方便。
- 路由: 大多数路由解决方案在其内部使用 context 来保存当前路由。这就是每个链接“知道”它是否处于活动状态的方式。如果你创建自己的路由库,你可能也会这么做。
- 状态管理: 随着你的应用的增长,最终在靠近应用顶部的位置可能会有很多 state。许多遥远的下层组件可能想要修改它们。通常 将 reducer 与 context 搭配使用来管理复杂的状态并将其传递给深层的组件来避免过多的麻烦。
Context 不局限于静态值。如果你在下一次渲染时传递不同的值,React 将会更新读取它的所有下层组件!这就是 context 经常和 state 结合使用的原因。
一般而言,如果树中不同部分的远距离组件需要某些信息,context 将会对你大有帮助。
摘要
- Context 使组件向其下方的整个树提供信息。
- 传递 Context 的方法:
- 通过
export const MyContext = createContext(defaultValue)创建并导出 context。 - 在无论层级多深的任何子组件中,把 context 传递给
useContext(MyContext)Hook 来读取它。 - 在父组件中把 children 包在
<MyContext value={...}>中来提供 context。
- 通过
- Context 会穿过中间的任何组件。
- Context 可以让你写出 “较为通用” 的组件。
- 在使用 context 之前,先试试传递 props 或者将 JSX 作为
children传递。
第 1 个挑战 共 1 个挑战: 用 context 替代逐层 props
在这个示例中,切换复选框状态会修改传入每个 <PlaceImage> 的 imageSize 参数。复选框的 state 保存在顶层的 App 组件中,但是每个 <PlaceImage> 都需要知晓它的值。
目前,App 将 imageSize 传递给 List,List 再将其传递给每个 Place,Place 又将其传递给 PlaceImage。移除 imageSize 参数,并在 App 组件中直接将其传递给 PlaceImage。
你可以在 Context.js 中声明 context。
import { useState } from 'react';
import { places } from './data.js';
import { getImageUrl } from './utils.js';

export default function App() {
  const [isLarge, setIsLarge] = useState(false);
  const imageSize = isLarge ? 150 : 100;
  return (
    <>
      <label>
        <input
          type="checkbox"
          checked={isLarge}
          onChange={e => {
            setIsLarge(e.target.checked);
          }}
        />
        Use large images
      </label>
      <hr />
      <List imageSize={imageSize} />
    </>
  )
}

function List({ imageSize }) {
  const listItems = places.map(place =>
    <li key={place.id}>
      <Place
        place={place}
        imageSize={imageSize}
      />
    </li>
  );
  return <ul>{listItems}</ul>;
}

function Place({ place, imageSize }) {
  return (
    <>
      <PlaceImage
        place={place}
        imageSize={imageSize}
      />
      <p>
        <b>{place.name}</b>
        {': ' + place.description}
      </p>
    </>
  );
}

function PlaceImage({ place, imageSize }) {
  return (
    <img
      src={getImageUrl(place)}
      alt={place.name}
      width={imageSize}
      height={imageSize}
    />
  );
}